> ## Documentation Index
> Fetch the complete documentation index at: https://docs.playflowcloud.com/llms.txt
> Use this file to discover all available pages before exploring further.
# Quick Start - Mirror
> Step-by-step tutorial for getting up and running with Mirror on PlayFlow Cloud
# Getting Started with Mirror on PlayFlow
This guide assumes you have some or all of your game already written using Mirror and are now ready to use PlayFlow to implement a dedicated server. You can also use PlayFlow throughout the development process as its one-click deployment makes it easy to setup a temporary server for testing.
**Mirror** is a high-level networking library for Unity that makes multiplayer game development easy with its clean API and battle-tested architecture.
## Prerequisites
Before you start, make sure you have:
* A Unity project using **Mirror** (or one of Mirror's example scenes, such as **Tanks** or **Pong**)
* **Linux Build Support** modules installed for your Unity version (via Unity Hub) so you can build headless servers
* A free [PlayFlow Cloud](https://app.playflowcloud.com/) account
## Before We Begin
If you don't have a project already setup but want to follow this tutorial, you can use one of Mirror's included examples like **Tanks** or **Pong**.
Mirror comes with several ready-to-use examples. The **Tanks** and **Pong** examples are great starting points for testing multiplayer functionality.
Now that we're ready to start, let's install PlayFlow Cloud. You can directly import it with the following git URL:
```
https://github.com/PlayFlowCloud/PlayFlow-Multiplayer-Unity-SDK.git
```
Simply add this through the Unity Package Manager and you'll be ready to continue!
If you need more detailed instructions for this step, check out the [Installation Guide](/guides/installation).
Ensure your Unity installation has the correct modules for building a server. Install the **Linux Build Support** modules for your Unity version in the Unity Hub.
Exact details on the required modules depending on your Unity version can be found in the [Unity Modules Setup](/guides/unity-modules) guide.
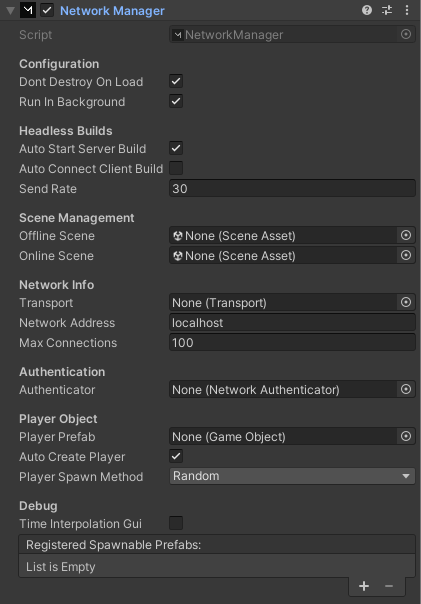
Select the NetworkManager in your project. Make sure **Auto Start Server Build** is checked - this will automatically start the server in headless builds.
 Mirror typically comes with **KCP Transport** by default, which is a UDP-based transport.
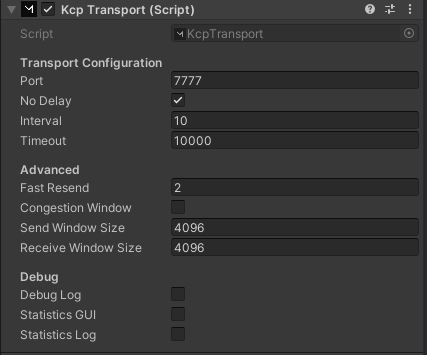 **Note the port number** (default is **7777**) - you'll need this for PlayFlow configuration.
Once that's all done we can move on to using PlayFlow Cloud!
## Deploying Your Game with PlayFlow
The PlayFlow dashboard is engine-agnostic, so some screenshots below were captured with a different Unity networking library. The buttons, tabs, and flow are identical for Mirror.
Go to the [PlayFlow Cloud website](https://app.playflowcloud.com/) and sign-up using your email, or log in with your GitHub or Google account. If asked, confirm your email address to complete the setup.
Create an Organization to hold your projects (and your team, on Pro).
* Enter an organization name
* Click **Create Organization**
New organizations start on the **Free** plan. You can upgrade to **Pro** later from the billing page for unlimited active servers, larger compute sizes, and longer server lifetimes.
Click **Create New Project** and enter:
* **Project Name**: Your game name
* **Game Engine**: Unity
* **Game Type**: Choose what fits (or Other)
Click **Create Project** to proceed.
Your PlayFlow dashboard shows logs, metrics, server details and more.
**Note the port number** (default is **7777**) - you'll need this for PlayFlow configuration.
Once that's all done we can move on to using PlayFlow Cloud!
## Deploying Your Game with PlayFlow
The PlayFlow dashboard is engine-agnostic, so some screenshots below were captured with a different Unity networking library. The buttons, tabs, and flow are identical for Mirror.
Go to the [PlayFlow Cloud website](https://app.playflowcloud.com/) and sign-up using your email, or log in with your GitHub or Google account. If asked, confirm your email address to complete the setup.
Create an Organization to hold your projects (and your team, on Pro).
* Enter an organization name
* Click **Create Organization**
New organizations start on the **Free** plan. You can upgrade to **Pro** later from the billing page for unlimited active servers, larger compute sizes, and longer server lifetimes.
Click **Create New Project** and enter:
* **Project Name**: Your game name
* **Game Engine**: Unity
* **Game Type**: Choose what fits (or Other)
Click **Create Project** to proceed.
Your PlayFlow dashboard shows logs, metrics, server details and more.
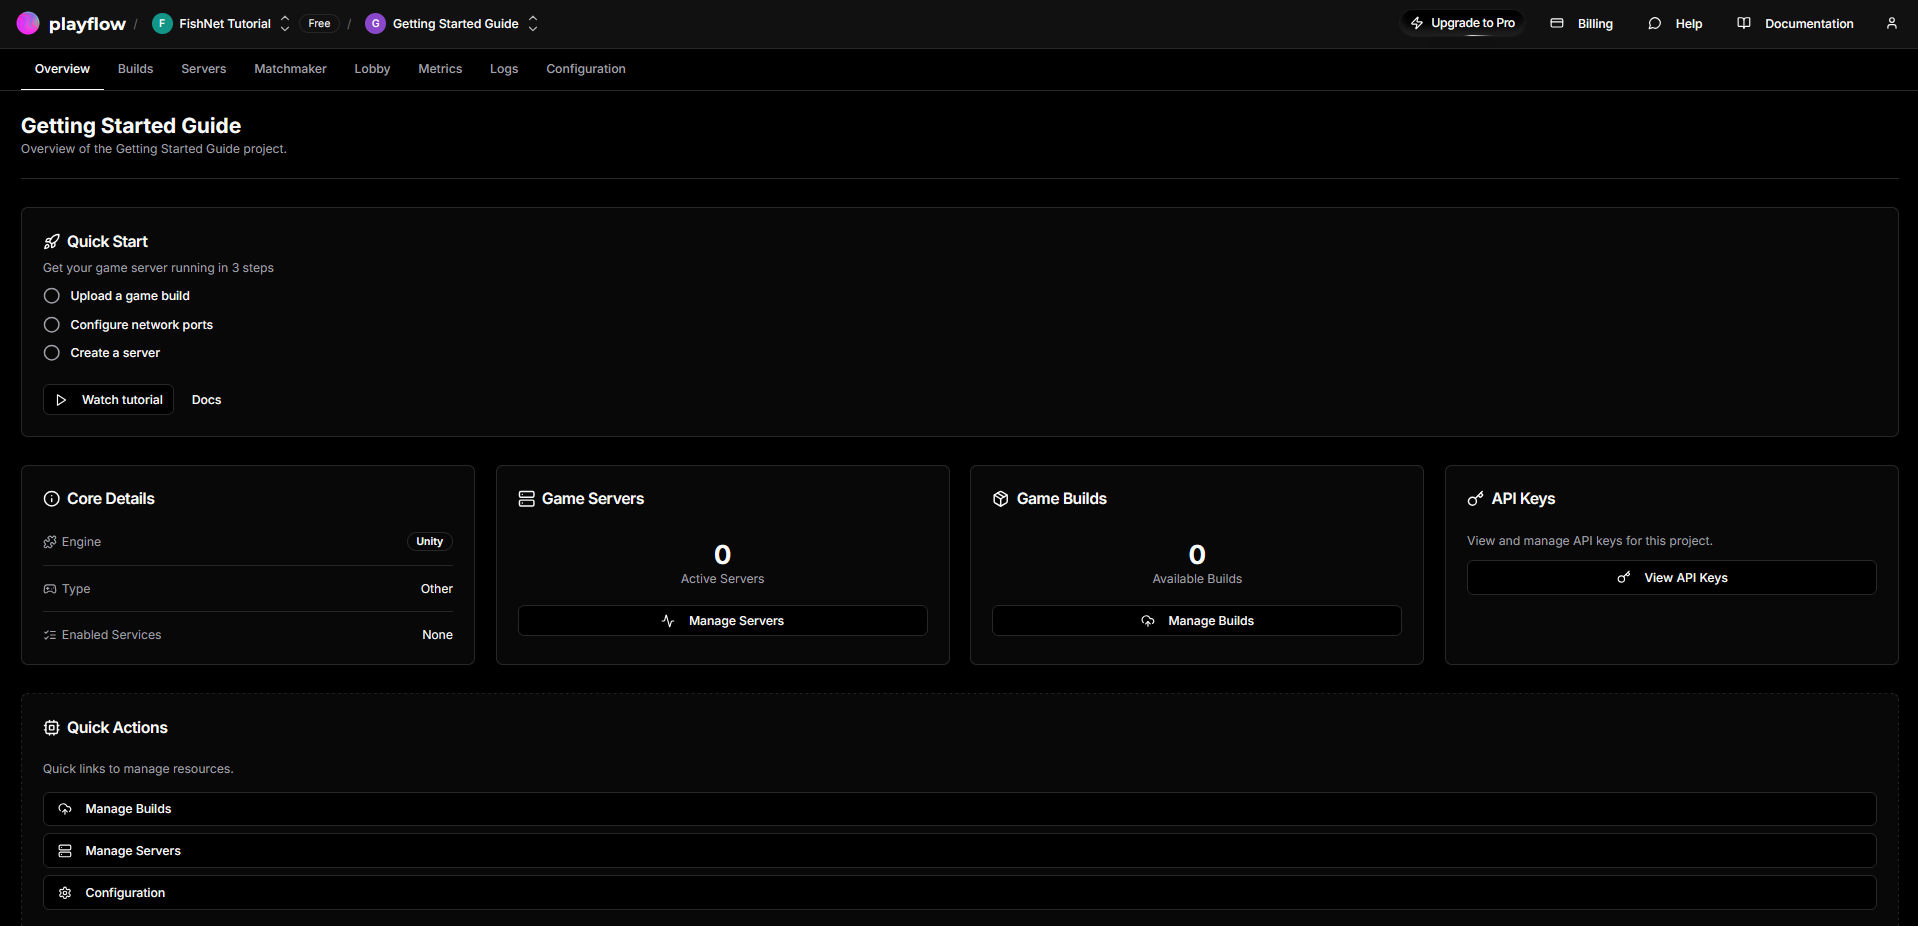 Now let's link our Unity Project to the PlayFlow one we've just created.
1. Open the **Overview** page in the PlayFlow dashboard
2. Find the **API Keys** section and click the **View API Keys** button
3. Copy the **PlayFlow API Key** to your clipboard
4. In Unity Editor, open the PlayFlow window from the Toolbar at **PlayFlow → PlayFlow Cloud**
5. Inside the Token field, paste the **PlayFlow API Key** you copied
Now let's link our Unity Project to the PlayFlow one we've just created.
1. Open the **Overview** page in the PlayFlow dashboard
2. Find the **API Keys** section and click the **View API Keys** button
3. Copy the **PlayFlow API Key** to your clipboard
4. In Unity Editor, open the PlayFlow window from the Toolbar at **PlayFlow → PlayFlow Cloud**
5. Inside the Token field, paste the **PlayFlow API Key** you copied
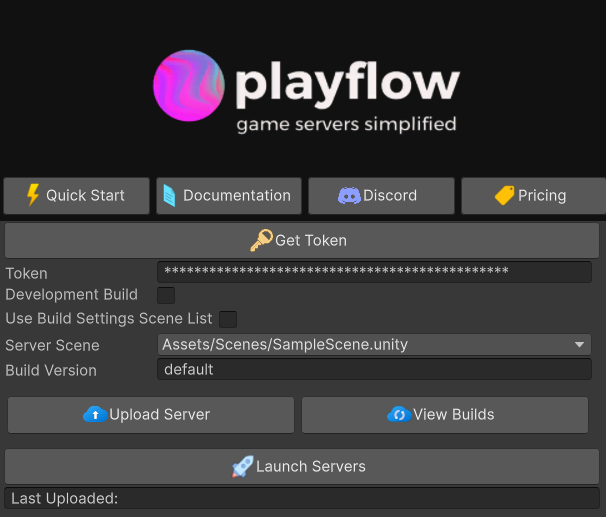 You can now customize the other settings in the PlayFlow Cloud window, such as the Development Build or Server Scene.
When you're happy with those, press the **Upload Server** button to have PlayFlow automatically build and upload a headless Linux server build of your game. This will take a brief moment, and then you will have a log in the editor console saying the build uploaded successfully.
If needed, you can browse the files of the build and delete it directly from the PlayFlow Dashboard under the Builds tab; pressing the **View Builds** button in the PlayFlow window will open this directly for you.
Now we will setup the port to use in the PlayFlow dashboard. Open up the website and head to the **Configuration** tab and then **Network Ports** section. Click the **Add Your First Port** button and fill in the fields.
You can now customize the other settings in the PlayFlow Cloud window, such as the Development Build or Server Scene.
When you're happy with those, press the **Upload Server** button to have PlayFlow automatically build and upload a headless Linux server build of your game. This will take a brief moment, and then you will have a log in the editor console saying the build uploaded successfully.
If needed, you can browse the files of the build and delete it directly from the PlayFlow Dashboard under the Builds tab; pressing the **View Builds** button in the PlayFlow window will open this directly for you.
Now we will setup the port to use in the PlayFlow dashboard. Open up the website and head to the **Configuration** tab and then **Network Ports** section. Click the **Add Your First Port** button and fill in the fields.
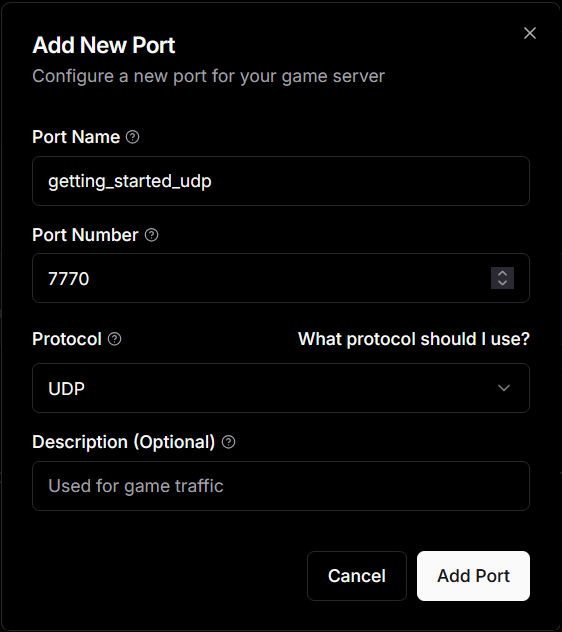 * **Port Name**: `mirror_udp`
* **Port Number**: `7777` (Mirror's default)
* **Protocol**: **UDP** (for KCP Transport)
* **Description (Optional)**: Optional
Click the **Add Port** button to finish this step.
Now we are ready to start our server, head over to the Servers tab and click the **Create Your First Server** button.
* **Port Name**: `mirror_udp`
* **Port Number**: `7777` (Mirror's default)
* **Protocol**: **UDP** (for KCP Transport)
* **Description (Optional)**: Optional
Click the **Add Port** button to finish this step.
Now we are ready to start our server, head over to the Servers tab and click the **Create Your First Server** button.
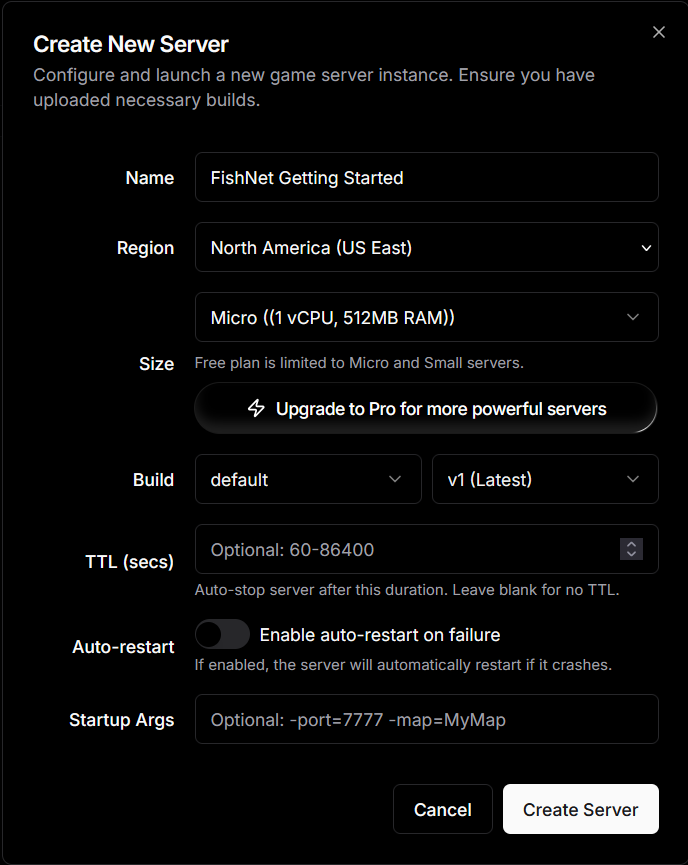 A window will pop-up letting you customize the settings for this server. You can change the **Name** to "Mirror Game Server", or choose any name you like as well as customizing the other settings to better suit your needs. Once you are happy, press **Create Server**.
You should now see the server in the Servers tab and you can see its details or stop it directly from here.
A window will pop-up letting you customize the settings for this server. You can change the **Name** to "Mirror Game Server", or choose any name you like as well as customizing the other settings to better suit your needs. Once you are happy, press **Create Server**.
You should now see the server in the Servers tab and you can see its details or stop it directly from here.
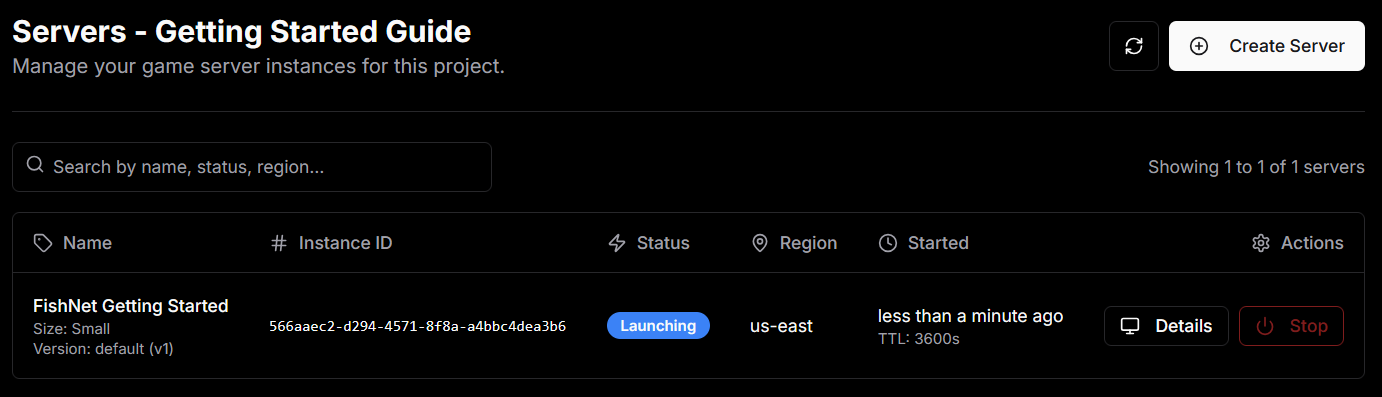 Click on the **Details** button to see the details of the server. Look at the **Details → Network** section and copy the Host and External Port.
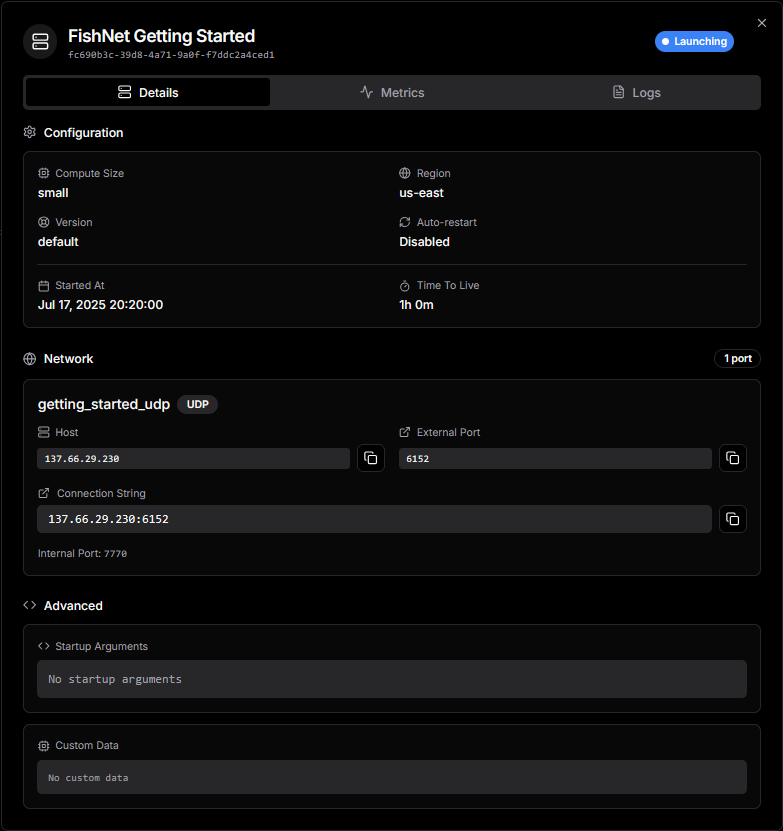 Configure your Mirror client with the PlayFlow server details:
**In NetworkManager:**
* Set **Network Address** to the Host from PlayFlow (e.g., `123.45.67.89`)
**In KCP Transport:**
* Set **Port** to the External Port from PlayFlow
**Alternative**: If using NetworkManagerHUD, you can enter these values at runtime in Play Mode instead of setting them in the Inspector.
Always read the **Host** and **External Port** from the running server (the dashboard's **Details → Network** section, or the `network_ports[]` array in the server API response). The external port is allocated by PlayFlow's proxy and **will not** match your internal `7777` config, so never hardcode it on the client.
1. Enter Play Mode in Unity or build your client
2. Click **Client** (not Host or Server)
3. Your game should connect to the PlayFlow server!
**Debugging Tips:**
* Check the PlayFlow dashboard logs to see server console output
* Ensure your firewall isn't blocking the connection
* Verify the transport and port settings match between client and server
## Take the Next Steps!
Well done! You've now learned how to setup and deploy your Mirror server using PlayFlow.
## Resources
* **PlayFlow Documentation**: [docs.playflowcloud.com](https://docs.playflowcloud.com/)
* **PlayFlow Discord**: [discord.gg/P5w45Vx5Q8](https://discord.gg/P5w45Vx5Q8)
* **Mirror Documentation**: [mirror-networking.gitbook.io](https://mirror-networking.gitbook.io/docs/)
* **Mirror Discord**: [discord.gg/mirror](https://discord.gg/mirror)
## Next Steps
Add lobbies to your Mirror game
Implement matchmaking for competitive play
Manage servers via API
## Common Issues
Ensure your auto-start script is attached to a GameObject in your scene and check for `UNITY_SERVER` or `UNITY_HEADLESS` preprocessor directives.
* Verify the port is correctly configured in PlayFlow (7777 for default Mirror)
* Check that your transport matches between client and server
* For KCP, ensure UDP protocol is selected in PlayFlow
* Ensure firewall rules aren't blocking connections
Make sure NetworkManager.singleton is set. This usually means the NetworkManager component needs to be in your scene before trying to access it.
Configure your Mirror client with the PlayFlow server details:
**In NetworkManager:**
* Set **Network Address** to the Host from PlayFlow (e.g., `123.45.67.89`)
**In KCP Transport:**
* Set **Port** to the External Port from PlayFlow
**Alternative**: If using NetworkManagerHUD, you can enter these values at runtime in Play Mode instead of setting them in the Inspector.
Always read the **Host** and **External Port** from the running server (the dashboard's **Details → Network** section, or the `network_ports[]` array in the server API response). The external port is allocated by PlayFlow's proxy and **will not** match your internal `7777` config, so never hardcode it on the client.
1. Enter Play Mode in Unity or build your client
2. Click **Client** (not Host or Server)
3. Your game should connect to the PlayFlow server!
**Debugging Tips:**
* Check the PlayFlow dashboard logs to see server console output
* Ensure your firewall isn't blocking the connection
* Verify the transport and port settings match between client and server
## Take the Next Steps!
Well done! You've now learned how to setup and deploy your Mirror server using PlayFlow.
## Resources
* **PlayFlow Documentation**: [docs.playflowcloud.com](https://docs.playflowcloud.com/)
* **PlayFlow Discord**: [discord.gg/P5w45Vx5Q8](https://discord.gg/P5w45Vx5Q8)
* **Mirror Documentation**: [mirror-networking.gitbook.io](https://mirror-networking.gitbook.io/docs/)
* **Mirror Discord**: [discord.gg/mirror](https://discord.gg/mirror)
## Next Steps
Add lobbies to your Mirror game
Implement matchmaking for competitive play
Manage servers via API
## Common Issues
Ensure your auto-start script is attached to a GameObject in your scene and check for `UNITY_SERVER` or `UNITY_HEADLESS` preprocessor directives.
* Verify the port is correctly configured in PlayFlow (7777 for default Mirror)
* Check that your transport matches between client and server
* For KCP, ensure UDP protocol is selected in PlayFlow
* Ensure firewall rules aren't blocking connections
Make sure NetworkManager.singleton is set. This usually means the NetworkManager component needs to be in your scene before trying to access it.