> ## Documentation Index
> Fetch the complete documentation index at: https://docs.playflowcloud.com/llms.txt
> Use this file to discover all available pages before exploring further.
# Quick Start - Fish-Net
> Step-by-step tutorial for getting up and running with PlayFlow Cloud
# Getting Started with PlayFlow
***
## Written Tutorial
This guide assumes you have some or all of your game already written using Fish-Net and are now ready to use PlayFlow to implement a dedicated server. You can also use PlayFlow throughout the development process as its one-click deployment makes it easy to setup a temporary server for testing.
This guide is based on the [official Fish-Net PlayFlow tutorial](https://fish-networking.gitbook.io/docs/guides/server-hosting/services/playflow-cloud/getting-started-with-playflow). Visit their guide for additional details.
## Before We Begin
If you don't have a project already setup but want to follow this tutorial, you can use the Fish-Net getting started tutorial project.
Download the Fish-Net tutorial project files
Now that we're ready to start, let's install PlayFlow Cloud. You can directly import it with the following git URL:
```
https://github.com/PlayFlowCloud/PlayFlow-Multiplayer-Unity-SDK.git
```
Simply add this through the Unity Package Manager and you'll be ready to continue!
If you need more detailed instructions for this step, check out the [Installation Guide](/guides/installation).
Ensure your Unity installation has the correct modules for building a server. Install the **Linux Build Support** modules for your Unity version in the Unity Hub.
Exact details on the required modules depending on your Unity version can be found in the [Unity Modules Setup](/guides/unity-modules) guide.
Select the NetworkManager in your project and add the Tugboat component if it isn't already there (if you are using a different transport, that is also fine).
**Enable the "Reuse Address" checkbox** - this will be needed for our server to work correctly.
The other two fields we'll be paying attention to are the **Port** and **Client Address** ones. For now you can leave the default settings, we'll remember the port number (7770) for later.
We want Fish-Net to automatically start as a server in the server build. Fish-Net will actually do this by default with the "Start on Headless" option on the ServerManager. If you disabled this, be sure to manage starting the server itself, or simply re-enable it.
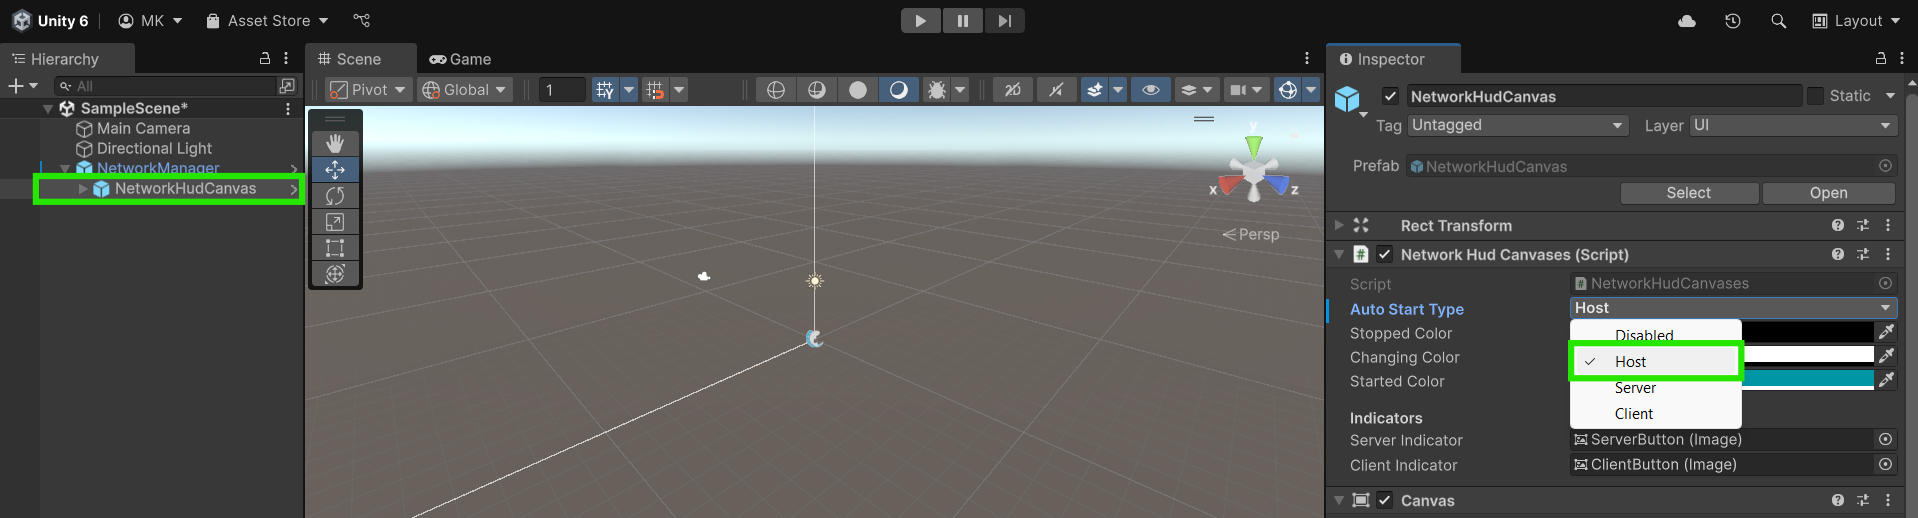
If you have set the NetworkHudCanvas Auto Start Type to something other than **Disabled**, then you will want to disable it now, since we want our server to only behave as a server.
Once that's all done we can move on to using PlayFlow Cloud!
## Deploying Your Game with PlayFlow
Go to the [PlayFlow Cloud website](https://app.playflowcloud.com/) and sign-up using your email, or log in with your GitHub or Google account. If asked, confirm your email address to complete the setup.
You'll now be prompted to create an Organization. Organizations hold your projects and let you collaborate with teammates.
Enter an organization name and click **Create Organization**. Every new organization starts on the **Free** plan, which is perfect for this tutorial. You can read more about the plan types [here](/fundamentals/plan-instance-types). When you're ready for more capacity, you can upgrade to **Pro** at any time from your organization's billing settings.
You can invite teammates and manage Team Collaboration from your organization settings once it's created, on either plan.
Now that you've created your first Organization, you'll be prompted to choose it and then we can move forward with creating a new project.
Click the **Create New Project** button and enter the details of your project:
* **Project Name**: Give your project any fitting name you'd like
* **Game Engine**: Select **Unity** as the Game Engine
Click **Create Project** to proceed.
With your new project created and selected, you can check out the PlayFlow dashboard for it.
PlayFlow has a lot of powerful features and makes it very easy for you, the developer of your game, to view the logs, metrics, server details and more. The PlayFlow dashboard can also be used to directly upload your game's server builds and manage server instances.
Once you're done looking around, we'll jump into setting up our server build and running it.
Now let's link our Unity Project to the PlayFlow one we've just created.
1. Open the **Overview** page in the PlayFlow dashboard
2. Find the **API Keys** section and click the **View API Keys** button
3. Copy the **PlayFlow API Key** to your clipboard
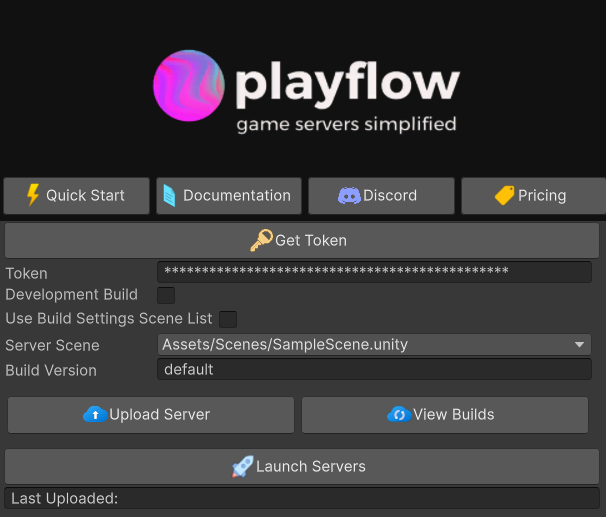
4. In Unity Editor, open the PlayFlow window from the Toolbar at **PlayFlow → PlayFlow Cloud**
5. Inside the Token field, paste the **PlayFlow API Key** you copied
You can now customize the other settings in the PlayFlow Cloud window, such as the Development Build or Server Scene.
When you're happy with those, press the **Upload Server** button to have PlayFlow automatically build and upload a headless Linux server build of your game. This will take a brief moment, and then you will have a log in the editor console saying the build uploaded successfully.
If needed, you can browse the files of the build and delete it directly from the PlayFlow Dashboard under the Builds tab; pressing the **View Builds** button in the PlayFlow window will open this directly for you.
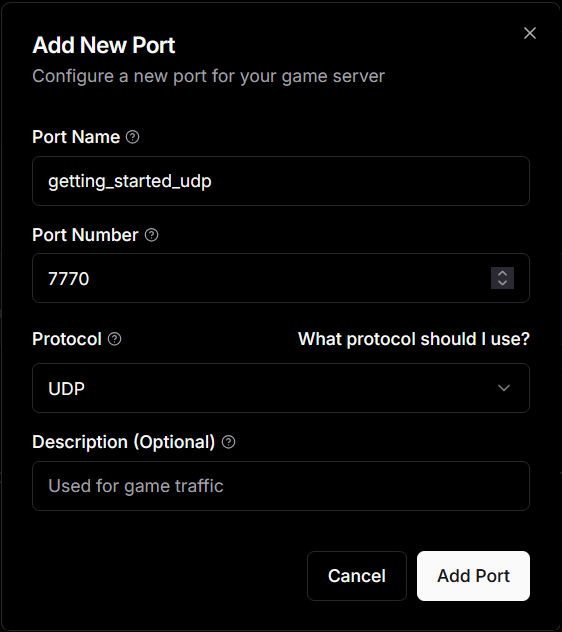
Now we will setup the port to use in the PlayFlow dashboard. Open up the website, go to the project **Settings** tab, then the **Configuration → Network Ports** section. Click the **Add Port** button and fill in the fields.
* **Port Name**: We can enter a simple name for it here, we'll just call ours `getting_started_udp`
* **Port Number**: This field should be filled in with the port we have entered in our Transport's Port field. Since we are using Tugboat, the default is `7770`, so enter that now
* **Protocol**: This is the protocol used by your transport, Tugboat uses UDP, so leave that as the option
* **Description (Optional)**: This field is optional and self-explanatory
Once those are entered, click the **Add Port** button to finish this step.
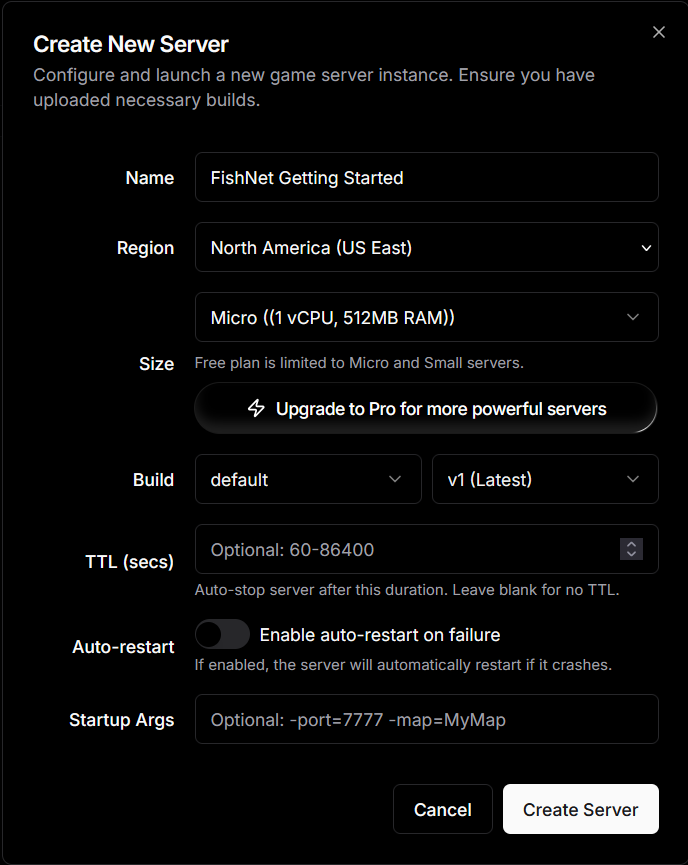
Now we are ready to start our server, head over to the Servers tab and click the **Create Your First Server** button.
A window will pop-up letting you customize the settings for this server. You can change the **Name** to "Fish-Net Getting Started", or choose any name you like as well as customizing the other settings to better suit your needs. Once you are happy, press **Create Server**.
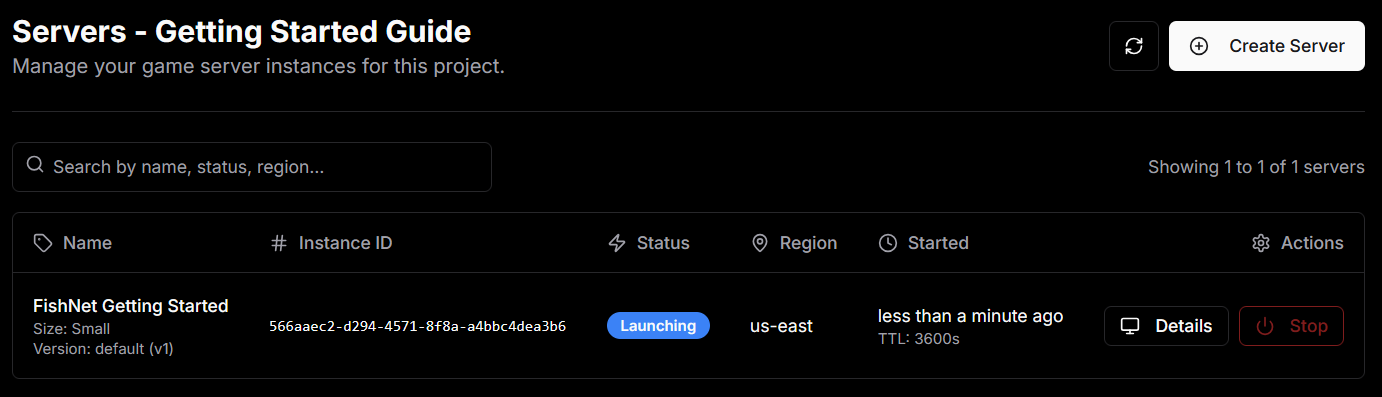
You should now see the server in the Servers tab and you can see its details or stop it directly from here.
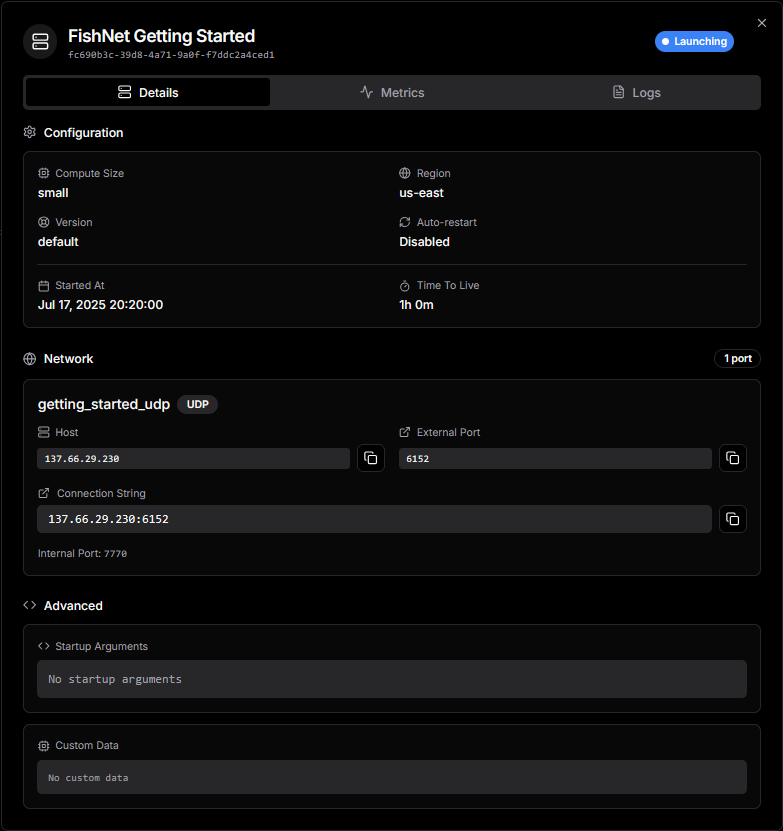
Click on the **Details** button to see the details of the server. You can view the Details, Metrics, and Logs of the server here. We will look at the **Details → Network** section and copy the Host and the External Port fields.
In the Unity Editor, select the Tugboat component (or other transport you may be using):
* Enter the IP Address you copied from the **Host** field into the Transport's Client Address field
* Enter the **Port** you copied into the Transport's Port field
You can now run the game or build and run it and connect as a client. Your game should connect to the PlayFlow server we setup and work correctly!
## Take the Next Steps!
Well done! You've now learned how to setup and deploy your server using PlayFlow.
## Resources
* **PlayFlow Documentation**: [docs.playflowcloud.com](https://docs.playflowcloud.com/)
* **PlayFlow Discord**: [discord.gg/P5w45Vx5Q8](https://discord.gg/P5w45Vx5Q8)
* **Fish-Net Documentation**: [fish-networking.gitbook.io](https://fish-networking.gitbook.io/docs/)
## Next Steps
Deploy Fish-Net for web browsers
Add Fish-Net compatible lobbies
Implement ranked matchmaking
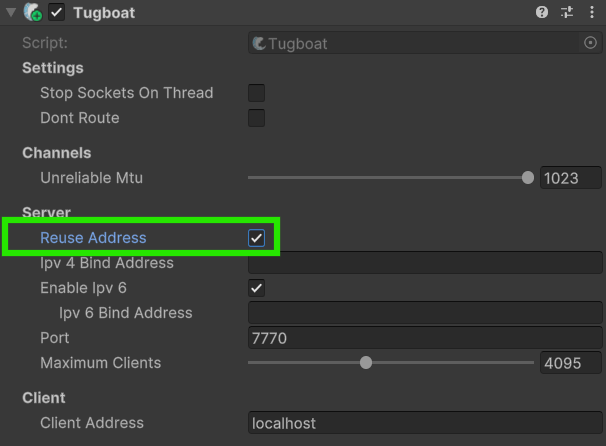 The other two fields we'll be paying attention to are the **Port** and **Client Address** ones. For now you can leave the default settings, we'll remember the port number (7770) for later.
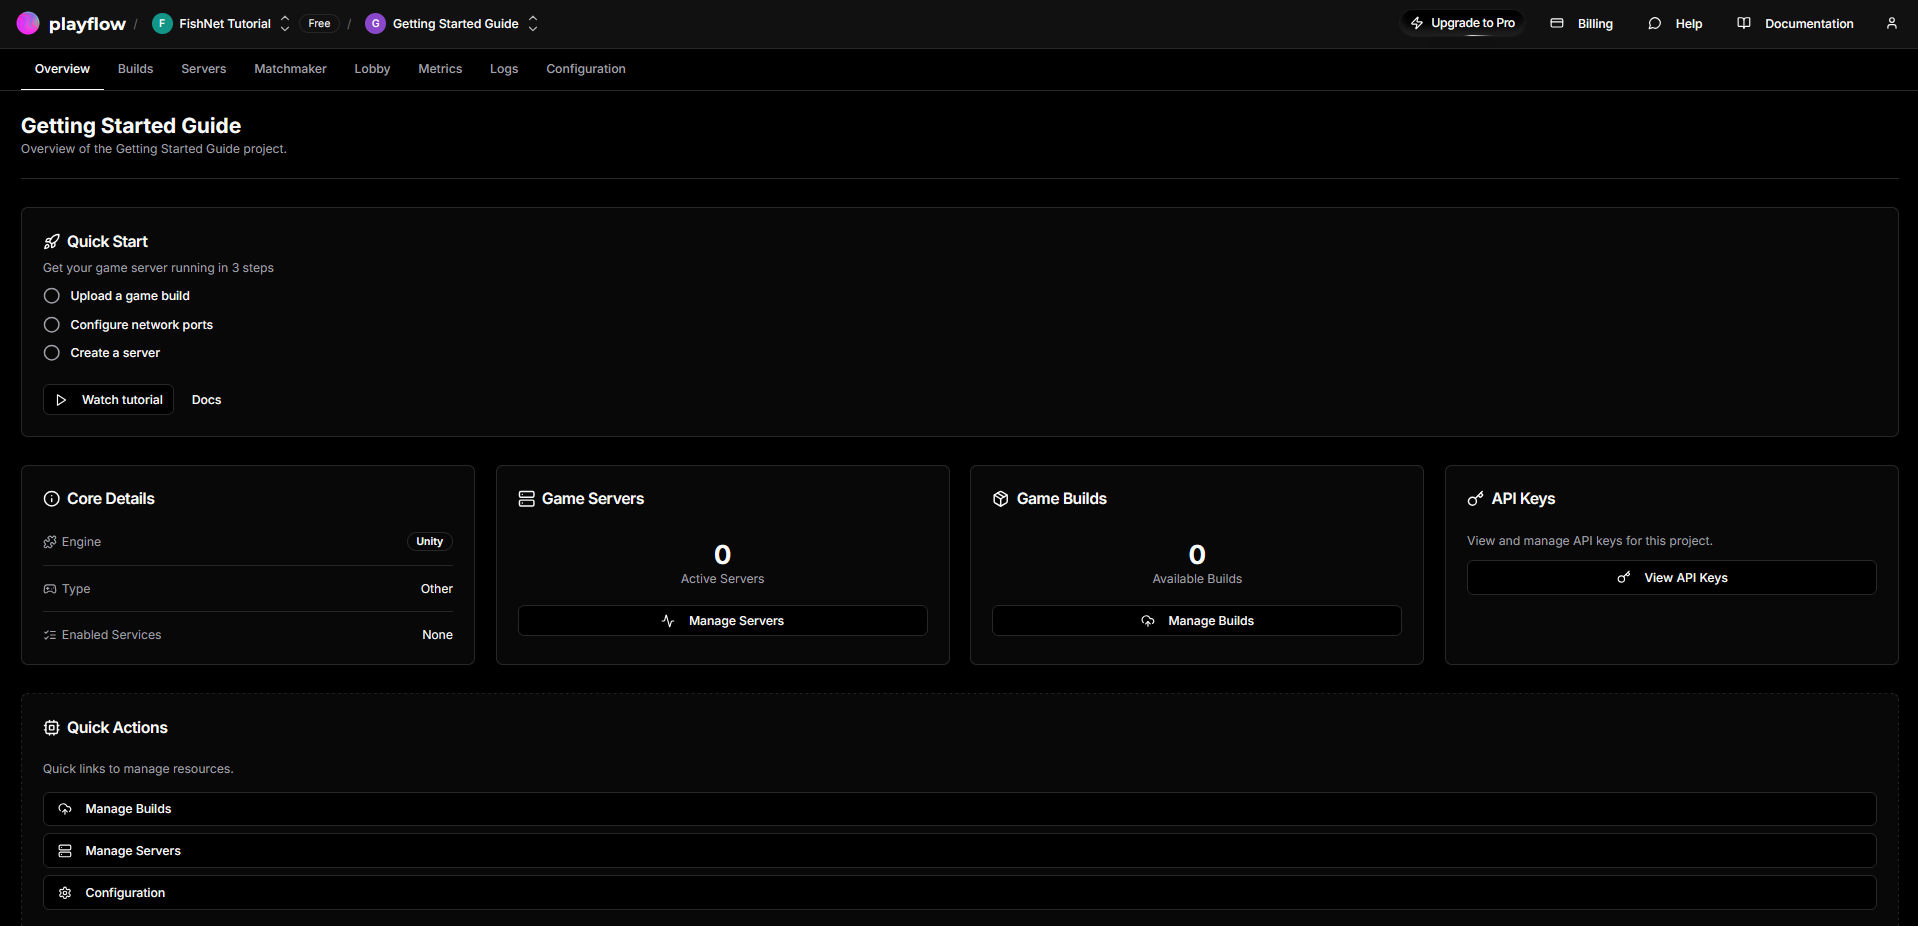 Once you're done looking around, we'll jump into setting up our server build and running it.
 * **Port Name**: We can enter a simple name for it here, we'll just call ours `getting_started_udp`
* **Port Number**: This field should be filled in with the port we have entered in our Transport's Port field. Since we are using Tugboat, the default is `7770`, so enter that now
* **Protocol**: This is the protocol used by your transport, Tugboat uses UDP, so leave that as the option
* **Description (Optional)**: This field is optional and self-explanatory
Once those are entered, click the **Add Port** button to finish this step.
* **Port Name**: We can enter a simple name for it here, we'll just call ours `getting_started_udp`
* **Port Number**: This field should be filled in with the port we have entered in our Transport's Port field. Since we are using Tugboat, the default is `7770`, so enter that now
* **Protocol**: This is the protocol used by your transport, Tugboat uses UDP, so leave that as the option
* **Description (Optional)**: This field is optional and self-explanatory
Once those are entered, click the **Add Port** button to finish this step.
 A window will pop-up letting you customize the settings for this server. You can change the **Name** to "Fish-Net Getting Started", or choose any name you like as well as customizing the other settings to better suit your needs. Once you are happy, press **Create Server**.
You should now see the server in the Servers tab and you can see its details or stop it directly from here.
A window will pop-up letting you customize the settings for this server. You can change the **Name** to "Fish-Net Getting Started", or choose any name you like as well as customizing the other settings to better suit your needs. Once you are happy, press **Create Server**.
You should now see the server in the Servers tab and you can see its details or stop it directly from here.
 In the Unity Editor, select the Tugboat component (or other transport you may be using):
* Enter the IP Address you copied from the **Host** field into the Transport's Client Address field
* Enter the **Port** you copied into the Transport's Port field
In the Unity Editor, select the Tugboat component (or other transport you may be using):
* Enter the IP Address you copied from the **Host** field into the Transport's Client Address field
* Enter the **Port** you copied into the Transport's Port field